Blue Gemstones: Sapphire, Topaz, Aquamarine, and Lookalikes
Use visible photo clues and a simple comparison workflow to distinguish blue gemstones like sapphire, topaz, and aquamarine, and learn safe next steps.
Quick answer for blue gemstones
Blue gemstones show telltale visible clues, but no single photo-only detail is proof. The strongest visual signals are consistent hue and tone across angles, specific inclusion types, and the gem’s cut or crystal habit. Those clues narrow likely identities—sapphire, aquamarine, and blue topaz—without replacing lab testing.
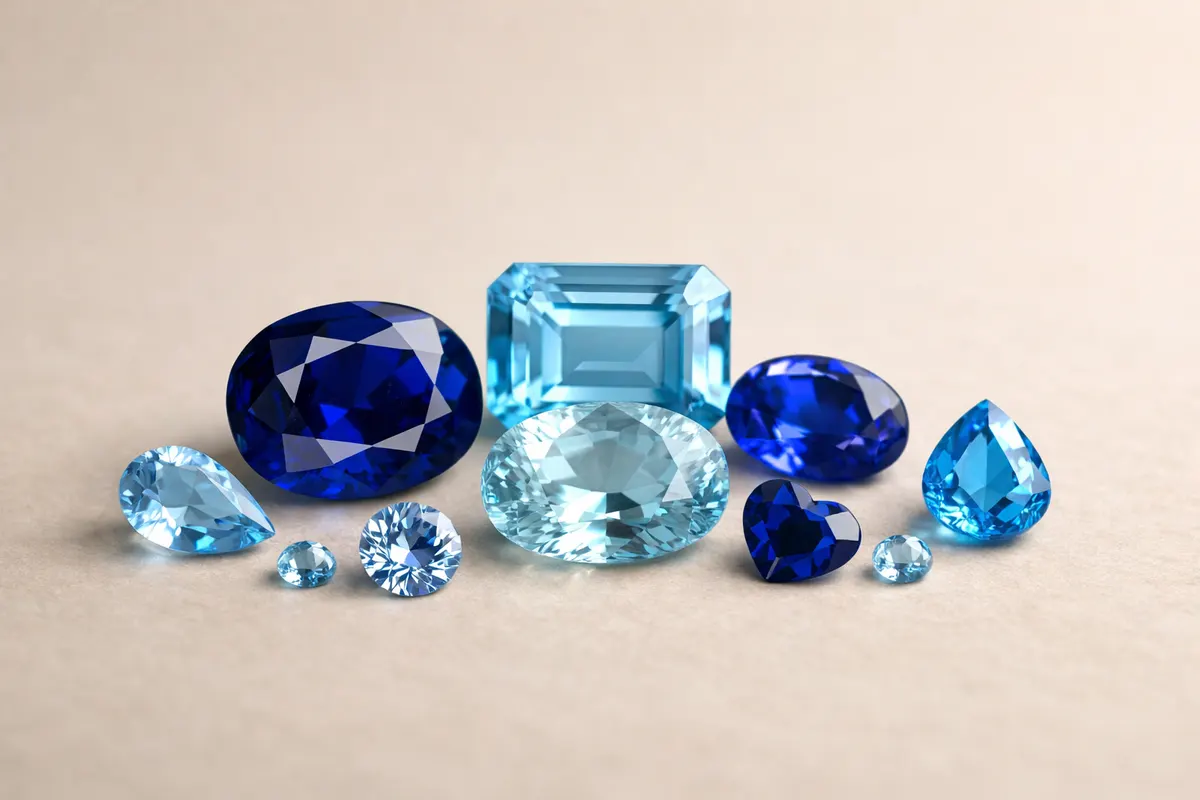
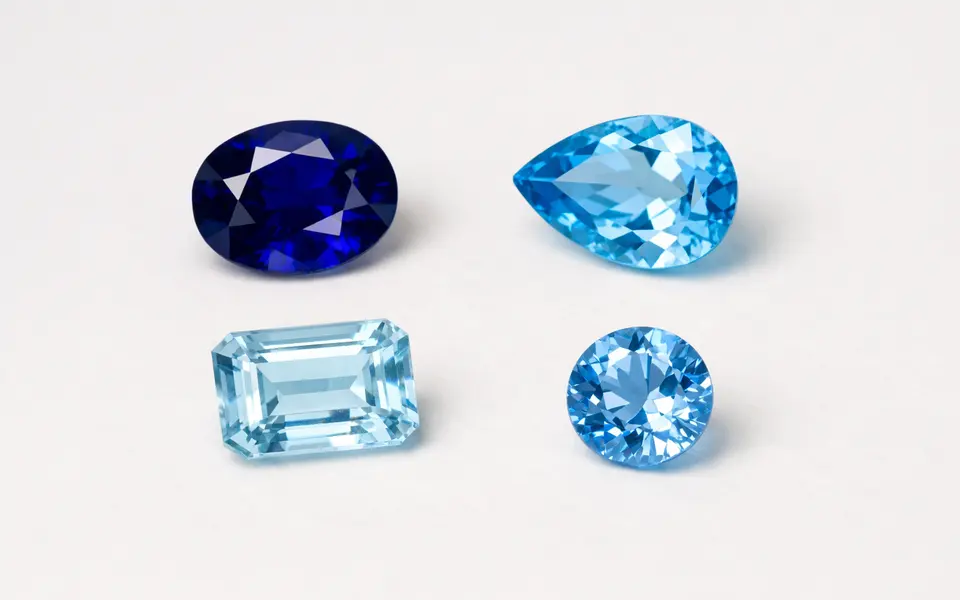
For a quick read: sapphires often show deep, saturated blues and characteristic inclusion textures (fine rutile “silk” in natural stones or color zoning in heat-treated examples); aquamarine (a variety of beryl) tends to be pale to medium blue-green and very clean; blue topaz is commonly bright sky-blue from treatment and often has different brilliance and facet style than beryl or corundum.
Use photos to gather consistent clues, then compare multiple images (diffuse daylight, macro, and backlit). If the evidence points strongly to one family, treat the result as a research lead and follow with a scanner or gem lab if identification, value, or authenticity matters.
Strongest visual clues
Hue, tone, and saturation are the first tier of evidence for blue gemstones. Note whether the blue leans toward pure blue, greenish-blue, or violet-blue, and whether it stays consistent when you rotate the stone. Aquamarine often sits in the pale blue–blue-green range; sapphire spans pale to very dark velvety blue; blue topaz commonly appears as vivid sky blue or London (deeper) blue when treated.
Inclusions and internal texture are highly useful when visible. Natural sapphires may show fine needle-like inclusions (“silk”), fingerprint patterns, or tiny mineral crystals. Aquamarine (beryl) tends to be cleaner and may show long chevron growth or small needle clusters. Synthetic glass, doublets, and assembled stones often reveal gas bubbles, flow lines, or unnatural layering that photographers can spot with a close macro photo.
Cut style and facet finish give context. Gem cutters use different proportions by species: sapphire and spinel often have deeper pavilion angles and classic brilliant or mixed cuts; aquamarine is commonly cut as emerald or step cuts to preserve carat weight and show clarity; topaz is usually given large facets to maximize sparkle. Look for consistent facet geometry and sharp facet junctions—poorly matched facets or a visible glue line indicate assembled pieces or imitations.
Surface features and edges can also be diagnostic in photos. Chips, cleavage planes, or a distinct softness at facet edges may indicate topaz (which has perfect cleavage) or glass imitations. Meanwhile, natural sapphire facet edges often stay crisp unless badly damaged. Combine these physical observations with color and inclusion clues rather than relying on any single trait.
- Color consistency across angles — true gem families often keep their basic tone; dramatic shifts suggest coatings or lighting trickery.
- Inclusion character — fine rutile silk suggests sapphire; long, clean growth tubes more likely in beryl; bubbles or curved flow lines point to glass.
- Cut style — emerald/step cuts favor aquamarine; brilliant/mixed cuts are common for sapphire and topaz.
- Edge and surface behavior — cleavage evidence or rounded facet junctions can hint at topaz or glass, respectively.
Weak signals
Color alone is a weak signal. Phone cameras, filters, and lighting shift blues dramatically—what looks ocean-blue in sunlight can appear gray or violet indoors. Avoid making identification calls based on one photo that emphasizes color without supporting clues.
Shine and sparkle are unreliable by themselves. Brilliance depends on cut quality and lighting angle; two different gem species cut the same way can look similarly sparkly in a single shot. Reflections, camera lens artifacts, and polishing differences can be mistaken for optical traits that only lab tools can confirm.
One-angle photos and non-macro images are often misleading. A single face-up picture hides pleochroism, color zoning, and many inclusion types. If you only have a single glam-style photo, treat any identification as tentative research rather than proof.
- Single photo color judgments — influenced by white balance, phone filters, and background.
- Sparkle/flashy appearance — strongly dependent on lighting and cut, not species.
- Shadows, reflections, and phone camera processing — can mask or fake inclusions.
Comparison workflow
A simple, repeatable comparison workflow turns scattered clues into a defensible lead. Start by collecting context: note the stone’s setting (antique, mass-market, handmade), any provenance or purchase details, and approximate carat size. A modern mass-market piece described as “blue topaz” is more likely treated topaz or glass than mined sapphire, for example.
Next, photograph the stone in three consistent ways: diffuse daylight (near a north-facing window or on shaded outdoors), a macro close-up with the camera focused on inclusions, and a backlit shot to reveal color zoning and transparency. These views show hue stability, internal features, and how light transmits through the material—three clues that together are far stronger than any alone.
Compare those photos against examples and known lookalikes. If the stone is very clean, pale blue, and step-cut, aquamarine becomes a strong candidate. If it’s intensely saturated, shows silk-like inclusions, and appears in a classic round brilliant or mixed cut, sapphire or spinel are likelier. Look up high-quality reference photos of each species under similar lighting and note which family shares multiple matching clues.
Use a short checklist to record findings and rule things out systematically. Over time this habit makes visual ID more reliable: you’re looking for pattern matches across several criteria rather than chasing a single “tell. ”
- Context: setting, age, vendor claim, and carat estimate.
- Photo trio: diffuse daylight, macro inclusion shot, and backlight/transparency shot.
- Match at least three independent clues (color family, inclusion type, cut/habit) before choosing a likely family.
- If clues conflict or are missing, mark the result as low confidence and seek further testing.
App workflow
After you collect photos and notes using the comparison workflow, use Stone Identifier - Gemalyze as a first-pass research tool to surface likely matches and similar examples. Treat the app’s suggestions as leads to investigate rather than final answers—especially when the confidence level is low or when multiple lookalikes appear.
When scanning with the app, feed it your best standardized photos: the diffuse daylight, the macro inclusion shot, and the backlit transparency image. The tool performs image-matching and can highlight probable species, common treatments (like topaz irradiation), and similar-looking imitations to check manually.
If the app highlights possible treatments, assembled stones, or conflicting matches, pause and record those flags as research notes. For any decision that affects purchase, sale, insurance, or repair, follow up with hands-on gemological testing (refractive index, magnification by a trained gemologist, or a certified lab report). The app accelerates narrowing candidates but does not replace laboratory verification.
- Use the three-photo set (diffuse, macro, backlit) when scanning in the app.
- Treat app results as research leads; low-confidence matches need lab follow-up.
- Record app flags about treatments or assembled construction as next-step reminders.
Use Stone Identifier - Gemalyze as your next step
After you gather the three-photo set and checklist, scan the images with Stone Identifier - Gemalyze to surface likely matches and treatment flags. Treat results as research notes—if matches are low-confidence or important decisions depend on the ID, follow up with hands-on gemological testing.
Frequently asked questions
How can I tell sapphire from spinel in photos?
Sapphire and spinel can look very similar on first glance. In photos, check inclusion patterns and color depth: natural sapphires frequently show fine silk-like inclusions and subtle color zoning, while spinel tends to be cleaner with fewer needle-like inclusions. Compare cut style and saturation across angles; if the stone stays consistently velvety and deep, sapphire is plausible. Because overlap is common, treat a photo identification as tentative and use lab testing for confirmation.
Can I reliably tell blue topaz from aquamarine by phone photos?
Not always. Aquamarine (beryl) usually shows a paler blue-green and excellent clarity, often cut in step patterns. Blue topaz, especially treated topaz, can be a vivid sky or London blue with brighter sparkle. But phone color shifts and similar cuts can confuse the two. Use backlighting and macro photos: aquamarine transmits light differently and often lacks the tiny bubbles or flow lines sometimes seen in glass imitations. If identification matters, plan for gem testing.
Why does the same blue gemstone look different in phone photos versus in hand?
Lighting, camera white balance, background color, and viewing angle all change perceived color and brilliance. Phones also apply automatic sharpening and color boosts that can deepen or mute blues. In-hand you see depth, pleochroism, and how color changes when the stone moves—details that a single phone shot often misses. Taking standardized photos in shaded daylight, plus rotating shots, helps reduce those differences.
What if the app or my photos give conflicting ID possibilities?
Treat conflicts as a sign to pause. Conflicting matches usually mean the visible clues are ambiguous—perhaps the stone has been treated, assembled, or is an imitation. Record each flagged possibility, gather more photos (especially macro and backlit), and if the stone’s identity matters for value or safety, arrange for hands-on gemological testing from a qualified lab.