Dark Blue Crystal Identification: Sodalite, Lapis, Sapphire, and Similar Stones
Learn how to tell sodalite, lapis, sapphire, and other dark blue stones apart using reliable photo clues, comparison steps, and safe follow-up checks.
Quick answer for dark blue crystal names
If you need a quick list of likely dark blue crystal names, start with sodalite, lapis lazuli, sapphire, azurite, and dumortierite. Those five appear most often in jewelry, tumbled stones, and rough specimens labeled simply as “dark blue. ”
The strongest single-photo clues that help separate them are: metallic gold flecks for lapis lazuli (pyrite), white calcite streaks or veins for sodalite, and clear transparency plus sharp facets or bright adamantine reflections for sapphire. Azurite tends to show a softer, earthy sheen and often mixes with green malachite. Dumortierite looks fibrous or splintery in close-up.
Color alone is a weak indicator: many species range from deep indigo to near-black depending on lighting and finish. Use the visible clues above together—texture, inclusions, and how the surface interacts with light—to narrow possibilities and assign a confidence level rather than a final ID.
If you suspect a sapphire or another potentially valuable gem, stop before testing that could damage the stone. Professional gem testing is the only way to prove identity and value; this guide helps you build a sensible short list from photos and non‑destructive checks.
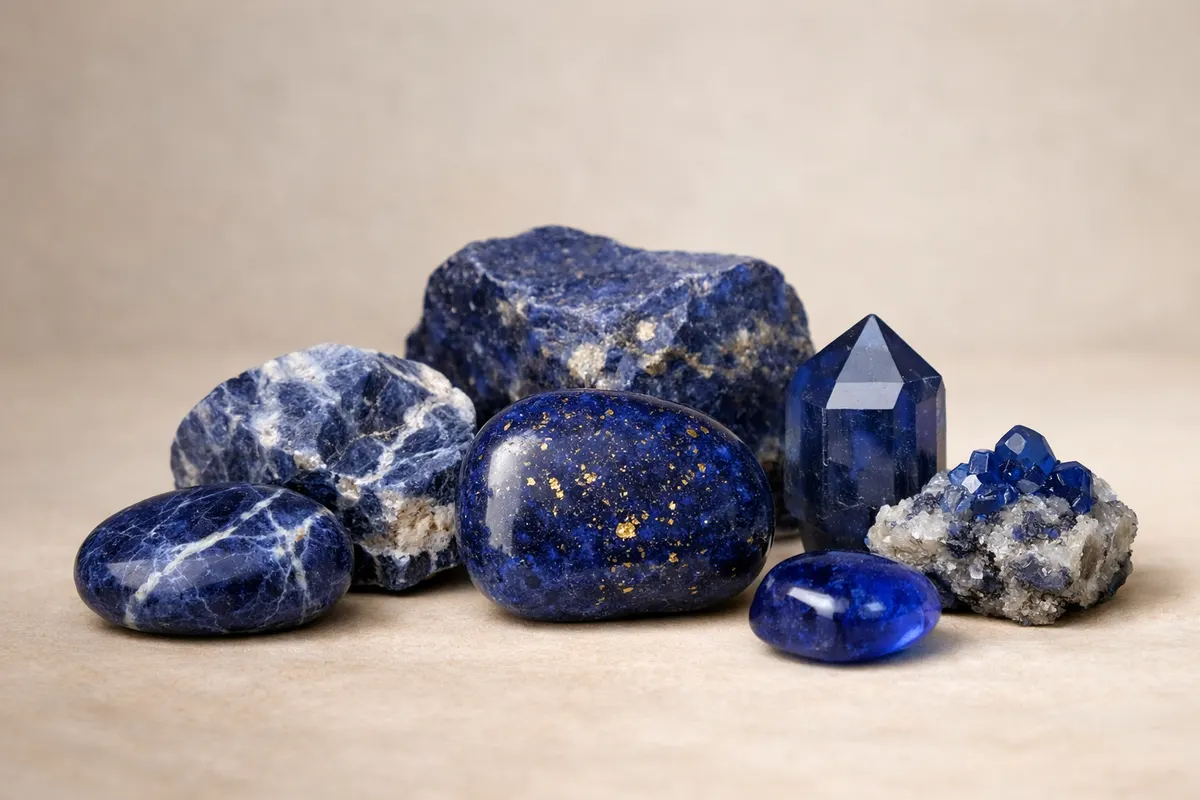
- Lapis lazuli: opaque deep ultramarine with gold pyrite flecks and occasional white calcite patches.
- Sodalite: often royal-to-indigo blue with white veins or patches of calcite and a duller luster than lapis.
- Sapphire: transparent to translucent, strong brilliance when faceted, sharp cleavage rarely seen in common rough.
- Azurite: earthy, velvety blue that commonly appears with green malachite and a softer lustre.
- Dumortierite: fibrous or splintery texture, sometimes violet-blue, often seen in mineral specimens and carving material.
Strongest visual clues
Prioritize clues that persist across lighting and camera quality: inclusions, texture, and how the stone handles light. These survive phone photos better than exact color shades.
Inclusions. Golden metallic specks (pyrite) are a strong positive for lapis lazuli when they appear embedded across an opaque blue ground. White streaks or patches scattered through blue material point toward sodalite (or lapis with calcite). Tiny plate-like, bright internal reflections—especially in transparent stones—lean toward gem corundum (sapphire).
Transparency and luster. A stone that passes light or shows internal brilliance when tilted is unlikely to be sodalite or lapis (both typically opaque). Sapphire is often transparent or at least translucent at edges and displays a high, gemmy luster when polished or faceted. Azurite and other secondary copper minerals usually present an earthy to vitreous luster but remain opaque.
Texture and crystal habit. Fibrous or splintery textures suggest dumortierite or some varieties of kyanite; botryoidal or rounded crusts that include green tones point toward azurite/malachite mixes. Smooth, granular blue with flecks of different minerals is more characteristic of lapis in lapidary pieces.
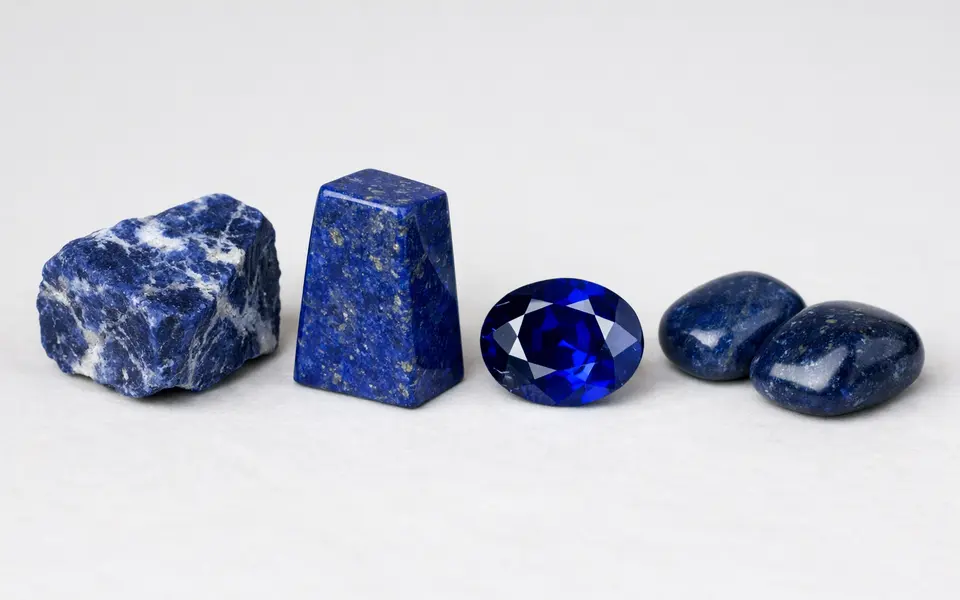
- Pyrite flecks: strong sign of lapis lazuli—look for irregular gold specks distributed through the blue.
- White calcite veins: common in sodalite and can produce a marbled blue-and-white look.
- Transparency through thin edges: indicates corundum (sapphire) or other transparent gems rather than opaque rock-forming minerals.
- Fibrous appearance under magnification: dumortierite or similar fibrous minerals.
- Associated green or earthy matrix: look for malachite or weathered host rock—common with azurite.
Weak signals
Color name or depth is the weakest single clue. Two stones photographed in different lighting can look identical; strong studio light, phone auto-enhance, and polishing can shift hue dramatically. Don’t assume ‘deep blue’ equals sapphire.
Surface shine or polish is misleading. A cheap dye, polish, or resin coating can make an inexpensive stone mimic the gloss of a gem. Conversely, a well-weathered high-value specimen can look dull. Evaluate polish only alongside internal clues and texture.
Single-angle photos and heavy reflections create false impressions of transparency and facet sharpness. One reflection does not prove clarity or gemstone class; multiple angles and detail shots of inclusions matter more.
Size, weight, or a supplied label in a photo are not proof of identity. Seller tags, beads, or settings can mislabel materials intentionally or accidentally. Treat such cues as context, not confirmation.
- Relying on hue alone is risky—many blue minerals overlap in tone.
- Polish/reflection can be imitated by coatings or glass substitutes.
- One photo showing sparkles doesn’t prove gem-quality sapphire—sparkles can be surface reflections.
- Matrix or host rock in a cropped image can be misleading; always seek an uncropped contextual shot.
Comparison workflow
Work from broad to specific: first eliminate impossible matches, then compare the strongest clues side-by-side. Assign a tentative confidence level—likely, possible, unlikely—for each candidate dark blue crystal name to prioritize next steps.
Step 1: Collect three photo types for each stone—(A) close-up detail showing inclusions and texture, (B) side/edge view to show thickness or translucency, and (C) a contextual shot for scale and matrix. Consistent photos make comparison much faster and reduce false leads.
Step 2: Screen for diagnostic markers. In your photos, ask: are there metallic flecks (lapis)? white calcite patches (sodalite)? is the interior clearly glassy or gemlike (possible sapphire)? is the surface fibrous or splintery (dumortierite)? note the results and drop unlikely candidates.
Step 3: Use non-destructive physical checks when possible. Heft (how heavy it feels for its size) can suggest a denser gem versus porous host rock, and a gentle tooth test for hardness is not recommended for valuable or sentimental pieces—seek a professional instead. When in doubt about value or commercial grade, stop and consult a gemologist.
- Collect 3 photo angles: detail, edge/translucency, and context with scale.
- Mark observed clues and assign confidence scores to each candidate.
- Drop candidates that contradict multiple strong clues (e. g. , visible pyrite excludes transparent sapphire).
- When you reach a likely match for a potentially valuable stone, pause further DIY testing and seek lab verification.
App workflow
After you run the photo checklist, use the Stone Identifier - Gemalyze app on your phone to organize images, tag observed clues, and build a shortlist of dark blue crystal names. The app helps you compare candidates visually and keep notes about why you leaned toward each match.
In the app, create a project for the specimen and attach the three recommended photos. Tag each photo with quick labels—pyrite, white calcite, transparent edge, fibrous texture—and add your confidence level. That structured record speeds triage and makes it easier to explain your observations to a jeweler or lab.
Use the app’s compare view to lay likely matches side-by-side and highlight the visual clues that support or refute each option. When a stone is flagged as possibly valuable (for example, a transparent, well-faceted blue that looks like corundum), export the notes and images to share with a qualified appraiser or gem lab for testing.
The app is intended as a first-pass organizing tool—not a substitute for gem testing. Treat its suggestions as hypotheses: valuable or ambiguous stones still need weight, refractive index, and spectral tests handled by professionals.
- Create a specimen project and add 3 photo angles for consistent comparison.
- Tag visible clues (pyrite, calcite, translucency, fibrous texture) and record confidence.
- Compare candidates visually in the app and mark which clues eliminate options.
- Export your organized notes and photos when you need a pro to confirm identity.
Organize your photos and test your shortlist with Stone Identifier - Gemalyze
Use the Stone Identifier app on your phone to attach multiple angles, tag visible clues (pyrite, calcite, translucency), and build a confidence-ranked shortlist of dark blue crystal names. When a stone looks potentially valuable or uncertain, export your notes and photos straight from the app to share with a gemologist for formal testing.
Frequently asked questions
How can I tell lapis lazuli from sodalite in photos?
Look for pyrite and calcite. Lapis lazuli commonly contains visible gold‑colored pyrite flecks spread through an opaque ultramarine ground, while sodalite usually shows white calcite patches or veins and lacks metallic specks. Lapis often appears richer and slightly more variegated; sodalite tends toward a more uniform blue with cleaner white veining.
What photo clues suggest a stone might be a sapphire rather than a blue rock?
Transparency at thin edges, bright gemmy luster on facets, and internal reflections consistent across angles suggest corundum (sapphire). If a stone shows clear internal structure or light passes through thin edges, and the surface reflections move predictably when you tilt the stone, treat sapphire as a possibility and seek professional testing rather than DIY destructive tests.
Can a single clear photo identify a dark blue crystal reliably?
No—one photo is rarely sufficient. Single images miss translucency, internal inclusions, and context that separate lookalikes. Capture multiple angles and close-ups to increase reliability, then organize the images and clues before deciding whether to pursue lab verification.
Are pyrite flecks always lapis lazuli?
Not always, but visible metallic gold specks embedded in an opaque blue matrix are a strong indicator of lapis lazuli in lapidary or rough pieces. Other minerals may contain iron sulfides too, so treat pyrite as a strong clue rather than conclusive proof—confirm with additional context and, if needed, professional testing.