Real vs Fake Gemstones: Photo Clues, Limits, and Safer Next Steps
Real vs fake gemstones: practical photo clues, what a phone image can (and can’t) tell you, plus safe next steps before paying for lab certification.
What is possible
When you're comparing real vs fake gemstones, a good photo can often reveal useful first-pass clues. A clear, well-lit image can show surface features, visible inclusions, color distribution, facet and polish quality, and signs of assembly (like seams or glue). Those visible traits let you narrow broad possibilities—glass, plastic, assembled doublets, and some common simulants are often distinguishable from natural or well-cut gems at a glance.
Photos also let you document provenance and condition. Date-stamped or sequential shots from multiple angles provide a baseline for future testing or appraisal and help a professional decide whether in-person examination is warranted. For low-value costume pieces, good photos plus a few visual checks frequently supply enough confidence for selling, gifting, or simple curiosity.
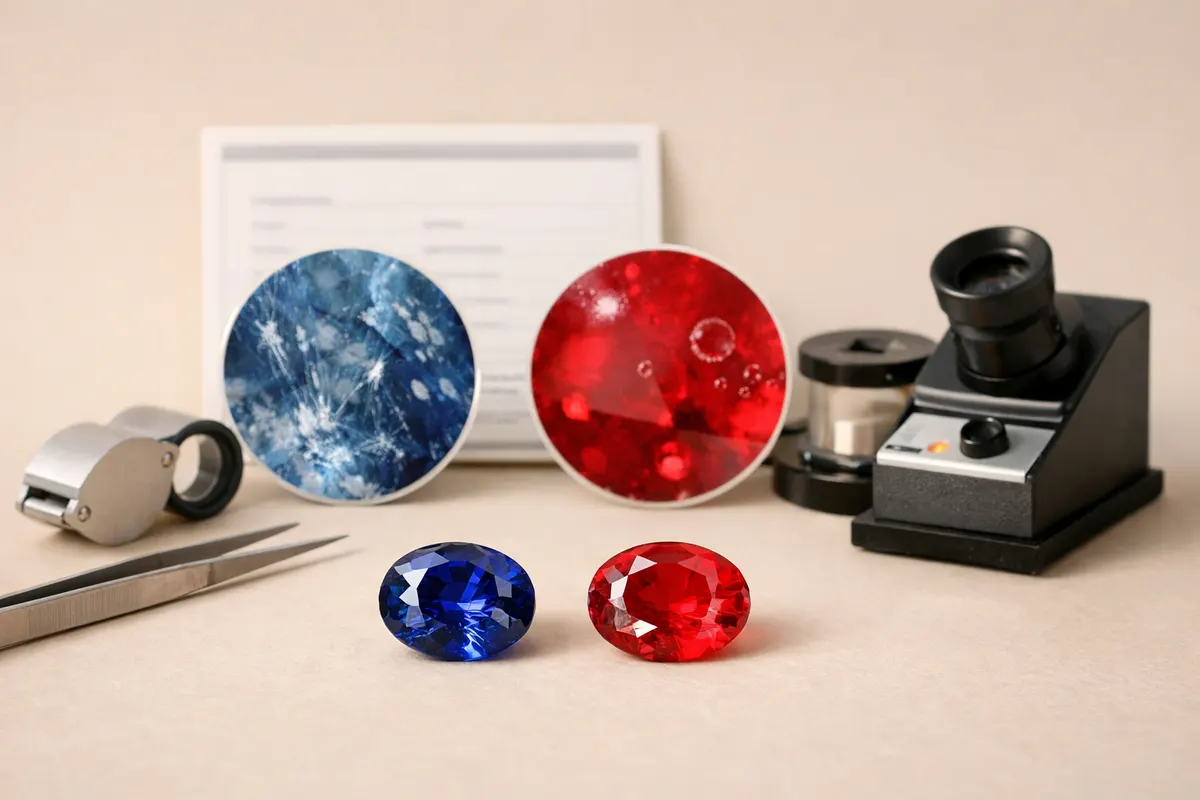
Some visual patterns reliably point to particular materials. For example, numerous small round bubbles and swirl lines inside a stone are a frequent hallmark of glass; uniform color without zoning can suggest dyed material; and perfectly sharp facet junctions with no wear may indicate a recent synthetic or molded piece. The app and an informed reviewer can call out these patterns so you know what to expect next.
Finally, photos can surface red flags that justify professional testing: inconsistent color zones, suspicious seams at the girdle, signs of recent polishing that may be hiding damage, or a lack of any internal structure in stones that should show inclusions. Use these photographic findings to decide whether to keep the stone as-is, get a jeweler’s loupe look, or move to formal laboratory testing.
What is not possible
A single photo cannot prove a gemstone’s authenticity, origin, treatment history, or market value. Many important properties—chemical composition, exact refractive index, specific gravity, and treatments such as heating, irradiation, or diffusion—require instruments and hands-on tests. Photos are a starting point, not a certificate.
Distinguishing natural from lab-grown gems is often impossible from images alone. Synthetic stones can be optically flawless and cut to mimic natural gems; only specialized testing (spectroscopy, growth structure analysis, or advanced microscopy) can reliably separate them. Similarly, surface coatings, dyeing, and composite constructions can be hidden beneath a polished finish and evade photographic detection.
You should not treat photo-based advice as appraisal or legal proof. Any statement about market value, insurability, or resale price based solely on a picture risks being incorrect. For financial decisions—selling, insuring, or buying an expensive gem—plan to get a written report from a qualified gemological lab or a trusted independent appraiser.
Never perform destructive tests because of a photo-based suspicion. Scratch, acid, or heat tests can permanently damage a stone and reduce its value. If a photo raises concern, the safer route is controlled, non-destructive testing by a trained professional rather than home experiments that might cause irreversible harm.
Visual clues
Photographs should prioritize steady focus, diffuse lighting, and a size reference (coin, ruler, or calibrated object). A mix of close-up and slightly offset shots helps reveal internal features and surface details. Sharp macro images often show what casual snapshots hide: tiny gas bubbles, growth lines, or glue seams.
Look for inclusion patterns. Natural gem inclusions are varied—needle-like rutile, tiny crystal ‘seed’ inclusions, irregular feathers, and mineral grains—while manufactured glass often contains round gas bubbles and curved flow lines. Consistent, repeating internal patterns or a very uniform ‘milky’ look can suggest synthetic production or heavy treatment.
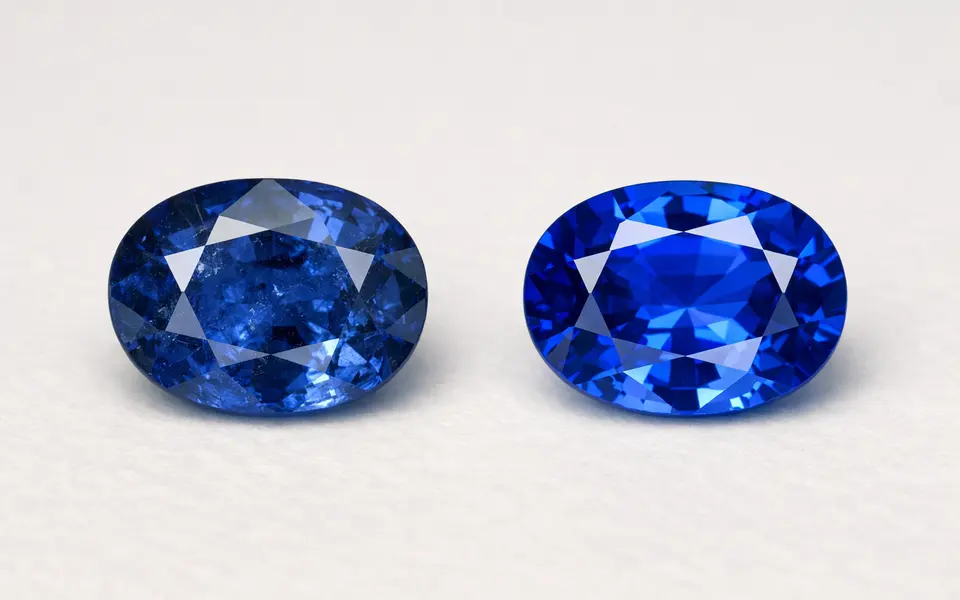
Surface and edge details matter. Compare facet junctions and girdle seams: an assembled doublet or triplet may show a thin line where layers are joined or slight mismatches in facet alignment. Plastic and resin often show edge wear and tiny tool marks that faceted gem material won’t. High luster (adamantine) versus glassy (vitreous) shine can also be telling; a trained eye can note subtle differences in how light disperses.
Color distribution and optical effects provide further signals. Natural stones often show color zoning or pleochroism (color shifts when viewed from different angles). Synthetic or dyed stones can have overly even color, or saturation concentrated at surface pits where dye pooled. Some materials—opal, labradorite, moonstone—have characteristic play-of-color or schiller that’s distinctive; when you’re unsure about a particular hue, compare with focused resources like our light blue crystal guide for common lookalikes and photo comparisons: https://stoneidentification. app/blog/light-blue-crystal-identification.
- Bubbles and curved flow lines — strong indicator of glass.
- Perfectly even color with no zoning — possible synthetic or dyed material.
- Sharp, repeated facet junctions and identical facets — manufactured or machine-cut simulant.
- Tiny seed crystals and irregular inclusions — common in natural stones.
- Visible seam or glue line at the girdle — assembled doublet/triplet.
- Soft, worn facet edges and scratches — lower hardness material like plastic or softer minerals.
- Play-of-color pattern (opals) or labradorescence — look for natural, irregular patterns, not printed flashes.
- Reflections that show doubled back facets — strong hint of double refraction in certain gems.
Verification path
Start by documenting the stone thoroughly. Take multiple photos: an overall shot, a close-up of any inclusions, a picture of the pavilion and girdle, and a scale reference. Note provenance details—where and when you acquired it, any receipts, prior appraisals, or seller descriptions. Good documentation speeds up professional checks and helps labs reproduce findings.
Use the app and simple, non-destructive checks as a second step. A 10x loupe, a small LED light, and polarized sunglasses can reveal many of the visual clues listed above without harming the stone. Avoid household scratch or acid tests; these can permanently damage surface polish and void warranties or reduce resale value.
When the stone might be valuable or the photo clues are ambiguous, seek experienced help. A trusted local jeweler with a microscope can often determine obvious imitations. For definitive answers—especially on origin, treatment, or high-value items—submit the stone to an accredited gemological laboratory (for example, GIA, AGS, or a local university lab). Labs use refractive index, specific gravity, spectroscopy, and growth-structure analysis to provide reliable reports.
Prepare for costs and timing. Basic identification from a private gemologist may be inexpensive and quick; full laboratory reports cost more and may take several days to weeks. If you plan to sell, insure, or inherit the piece, get a written certificate from an accredited lab. Keep the photos and any lab paperwork together as part of the gem’s provenance and for future reference.
- Document: multiple angles + scale + known provenance.
- Do non-destructive checks first: 10x loupe, LED light, polarized filter.
- Avoid scratch, heat, or acid tests at home.
- Local jeweler or gem club inspection for low-cost preliminary checks.
- Accredited lab (GIA/AGS) for treatment, origin, or high-value certification.
- Keep all receipts, photos, and prior appraisals for lab submission.
Related guides
Try a photo-first check, then confirm with testing
Use Stone Identifier - Gemalyze to get a quick visual read from photos and document the stone. If clues are ambiguous or the item could be valuable, schedule an in-person exam or a lab report for definitive authentication.
Frequently asked questions
Can a photo alone prove a gemstone is genuine?
No. A photo can show strong visual clues and help rule out obvious imitations, but it cannot prove chemical composition, treatment history, or origin. For proof you need hands-on testing from a qualified lab or gemologist.
My stone has tiny round bubbles—does that mean it’s fake?
Round gas bubbles are a common sign of glass. While they don’t automatically mean the piece is worthless—glass can be collectible—bubbles typically indicate a manufactured simulant rather than a natural gem.
Are lab-grown gems considered fake?
Lab-grown gems are real in chemical composition and often identical optically to natural stones, but they differ in origin. Whether they’re 'fake' depends on your definition and disclosure needs—lab-grown gems have legitimate, documented markets and should be labeled accurately.
How much does professional testing usually cost and how long does it take?
Costs vary from modest fees for a basic identification by a local gemologist to several hundred dollars for a full laboratory report. Turnaround can range from a day or two for local checks to one to several weeks for comprehensive lab services.