Rock and Mineral Field Clues: Luster, Streak, Hardness, and Context
Practical field checks for rock and mineral field clues: luster, streak, hardness, texture, and location tips that narrow matches before image checks.
Quick answer for rock and mineral field clues
Rock and mineral field clues are simple, observable properties you can check quickly in the field to rule in or out groups of materials before you rely on a photo-based identifier. The highest-yield clues are luster (how a surface reflects light), streak (the color of powdered mineral), hardness (scratch resistance), texture or grain, and immediate context (host rock, local geology, and nearby minerals).
Do a few small, safe tests: look at luster in good light, scrape a fresh surface and note the streak on unglazed porcelain, check hardness with common items (fingernail, copper coin, steel blade), and record texture and surroundings. Those clues often narrow possibilities from dozens to a handful.
Treat a single photograph or app match as a research note rather than final proof. Use field checks to raise or lower confidence, and confirm uncertain or valuable finds with a lab, local museum, or an experienced collector.
What it means
‘Rock and mineral field clues’ refers to directly observable and easily tested properties that help you separate common minerals and rock types in the field. These clues are not laboratory analyses; they are quick indicators that reduce the number of plausible identities before deeper testing.
Luster describes whether a surface looks glassy, metallic, pearly, dull, or resinous. Streak is the color of the powder produced when a mineral is dragged across unglazed porcelain—often more diagnostic than the visible color. Hardness is measured against reference materials and tells you which minerals can scratch others.
Texture and grain (for rocks) describe crystal size, alignment, and whether a rock is clastic, foliated, or vesicular. Context means the location, the surrounding rock types, and any visible mineral associations, which frequently give the strongest clues about likely minerals.
Key clues
Below are the field clues most likely to reduce identification uncertainty. Each clue is paired with how to check it quickly and what it usually rules in or out.
When you use these clues together, they form a checklist: luster narrows surface appearance, streak tests eliminate color variability, hardness bins minerals by scratchability, texture separates igneous/sedimentary/metamorphic fabrics, and context often picks the correct family.
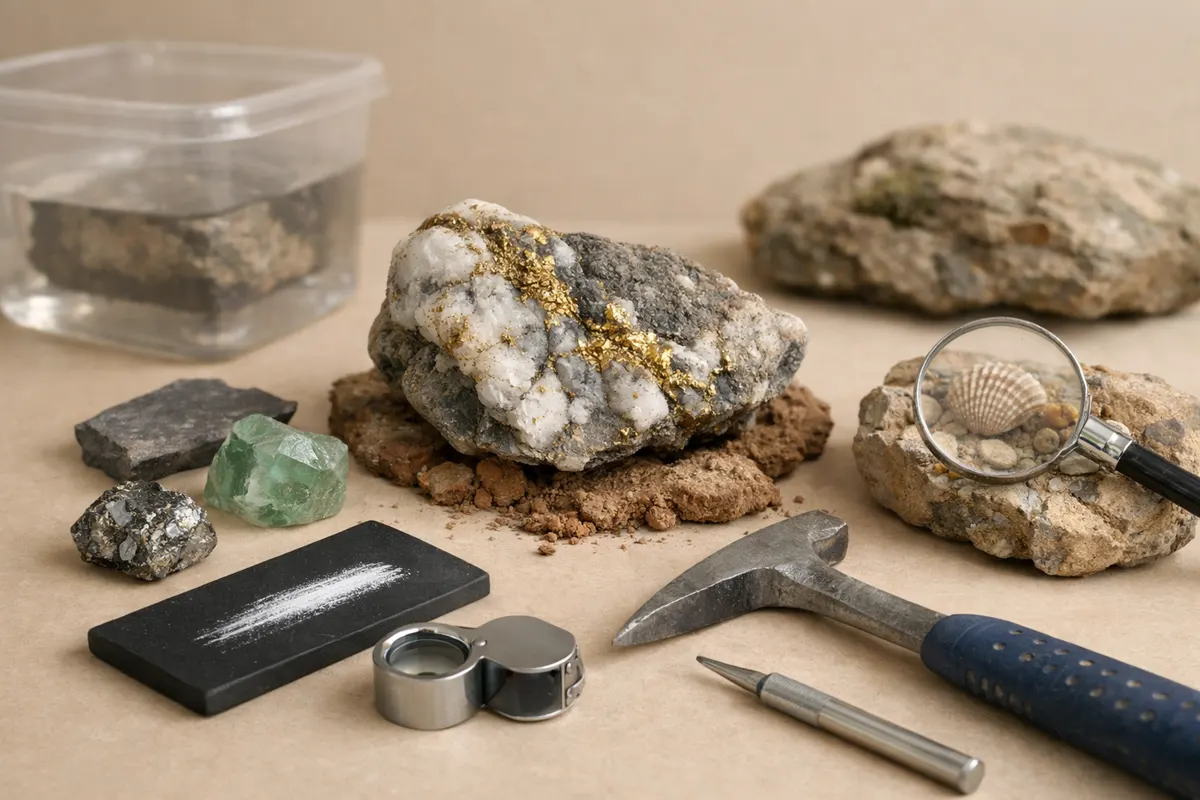
- Luster — Check in daylight and shade. Metallic luster (bright, mirror-like) points to sulfides and native metals (pyrite, chalcopyrite, native copper). Vitreous (glassy) is common in silicates like quartz and feldspar. Pearly luster suggests micas; resinous may indicate amber-like organics or some sulfides.
- Streak — Use a piece of unglazed porcelain (streak plate). Magnetite has a black streak; hematite leaves a reddish-brown streak even when the specimen looks metallic grey. If the streak color differs from the visible surface color, prefer the streak for mineral ID.
- Hardness — Use fingernail (~2. 5), copper coin (~3. 5), steel knife (~5. 5), and window glass (~5. 5–6). Quartz is ~7 and will scratch glass; calcite is ~3 and is scratched by a copper coin. Hardness quickly excludes wide groups (e. g. , anything softer than 3 can’t be quartz).
- Cleavage vs. Fracture — Observe broken surfaces: cleavage breaks along smooth planes (mica has perfect cleavage in one direction; feldspar shows two directions near 90°). Conchoidal fracture (smooth curved surfaces) suggests quartz or glassy materials.
- Texture / Grain — Fine-grained, coarse-grained, foliated, or vesicular patterns tell you about rock origin. Pegmatitic, large-grained textures point to slow-cooling igneous rocks; rounded clasts point to sedimentary origins.
- Color and Zoning — Use color cautiously. Some minerals have strong diagnostic colors (malachite green, azurite blue), but many silicates vary. Look for color zoning, banding, or consistent pigment that persists after scraping.
- Specific gravity / heft — Estimate by lifting: heavy-for-size specimens suggest metal-rich minerals (pyrite, galena) or dense carbonates. Compare handfuls to gauge relative density.
- Simple chemical reactions — A drop of dilute (household) vinegar or a weak acid on a fresh surface will fizz if calcite is present. Only test small pieces and be mindful of conservation rules for in-situ specimens.
- Magnetism and conductivity — A small magnet will quickly detect magnetite or native iron. Conductivity isn’t usually checked in the field, but magnetic response is a fast filter.
- Contextual clues — Note where you found the specimen: river gravels often include rounded quartz and feldspar; hydrothermal veins commonly host sulfides and quartz; pegmatites often yield large crystals such as tourmaline or beryl.
Step-by-step workflow
Follow a short, repeatable workflow to collect the most useful clues while preserving the specimen and your safety. The steps below are ordered so each one rules out broad classes before you spend time on finer tests.
Record notes and photos as you go: a photo of the specimen in place, a close-up of the surface in natural light, and a picture of any notable surroundings will help later comparison.
- 1) Observe in natural light. Photograph the specimen in daylight and shade, noting overall color, apparent luster, and any visible crystals or banding. Take a scale photo (coin or ruler) for size reference.
- 2) Check luster and surface features. Rub a fresh corner (if allowed) or inspect a broken or weathered edge to see true luster. Note whether the surface is metallic, glassy, dull, pearly, or greasy.
- 3) Perform a streak test. Scratch a small section on a streak plate away from any weathered coatings. Record the streak color and whether the streak is powdery or smeared.
- 4) Estimate hardness with common tools. Progress through fingernail → copper coin → steel knife → glass. Log which items scratch the mineral and which do not to bracket hardness.
- 5) Inspect cleavage and fracture. Try to find a freshly broken surface and look for flat planes or conchoidal breaks; note angles and counts of cleavage directions.
- 6) Note texture and grain. For rocks, describe crystal size and arrangement. Is it crystalline throughout, or are there rounded clasts? For minerals, note crystal habit when visible (bladed, prismatic, cubic).
- 7) Quick context checks. Check for effervescence with a drop of vinegar if carbonate is suspected; use a magnet for magnetic minerals. Record the local geology: stream, outcrop, mine dump, or beach.
- 8) Synthesize and narrow. Combine clues to make a short list of likely matches. Use a photo-based identifier as a next step to compare against these narrowed options, and treat app matches as hypotheses to be verified.
Examples
Example 1 — Shiny, heavy, brassy rock in a stream: The specimen looks metallic and bright in hand, feels heavy for its size, and leaves a black streak on porcelain. These clues point to a sulfide (pyrite or chalcopyrite). A magnet test is useful next; chalcopyrite often tarnishes with brassy color while pyrite is more uniformly metallic.
Example 2 — Dull red-brown chips on a hillside: Small fragments that crumble easily, with a reddish-brown streak and earthy texture, often indicate weathered hematite or ironstone. The streak differentiates hematite (red-brown) from other dark minerals that might look similar but leave darker streaks.
Example 3 — Clear, glassy crystals in an outcrop: Large, glassy crystals that scratch glass and show conchoidal fracture are most likely quartz. If you observe six-sided prismatic habit and hardness near 7, quartz becomes the primary candidate; feldspars will show cleavage where quartz does not.
Example 4 — Sheet-like shiny flakes in a roadside outcrop: Thin, flexible sheets that separate easily and have a pearly sheen suggest mica (muscovite or biotite). Biotite is darker and may be slightly flexible but not elastic, while muscovite is clearer and lighter in color.
Limitations
Field clues narrow possibilities but rarely provide immutable proof. Weathering, coatings, and lighting can hide diagnostic features; many minerals have overlapping properties (for example, several dark minerals can appear metallic at a glance). Treat field identification as a triage process that sorts specimens into likely groups.
A single photograph compounds uncertainty. Photos can miss subtle luster differences, fine cleavage, or the true streak color. Use field tests (streak, hardness, acid test) to confirm or contradict a photo-based match. Always note confidence levels: high (multiple consistent clues), partial (some clues but missing others), or uncertain (conflicting or absent clues).
When to seek professional help: if the specimen has potential monetary value, is a rare mineral, could be hazardous (e. g. , arsenic-bearing sulfides), or if accurate identification matters for research or legal reasons, pursue lab analysis or consultation with a qualified geologist. Do not assume a single test or app result is definitive for valuable or hazardous finds.
Next step: use your clues with Stone Identifier - Gemalyze
After you record luster, streak, hardness, texture, and context, open Stone Identifier - Gemalyze on your device to compare photo matches against the shortlist you created. Treat app suggestions as research notes: they help prioritize likely candidates but do not replace field tests or professional confirmation for valuable or hazardous finds.
Frequently asked questions
How do I do a streak test safely in the field?
Carry a small piece of unglazed porcelain (streak plate) in your field kit. Scratch the mineral across the plate on a fresh, unweathered surface and observe the powder color. If you must collect a sample, take only what local rules allow. Avoid producing dust with potentially toxic minerals; wear a simple mask if unsure.
What’s the fastest way to estimate hardness without a kit?
Use common items in this order to bracket hardness: fingernail (~2. 5), copper coin (~3. 5), a steel knife or pocket blade (~5. 5), and glass (~5. 5–6). If a specimen scratches glass, it's harder than ~6; if a fingernail leaves a mark the specimen is softer than ~2. 5. Record which items scratched and which did not.
Can luster be judged from a photo?
Photos can suggest luster but often fail to capture subtle differences. Metallic, glassy, and very dull surfaces usually show clearly, but pearly versus silky or resinous textures are easier to confirm in hand under varied light. Always inspect a fresh surface in natural light when possible.
How do I avoid misidentifying weathered surfaces?
Look for a fresh break or a sharp edge to see unweathered material. Weathering often darkens, dulls, or colors the outer surface. Scraping a tiny area to reveal a fresh surface or observing freshly broken fragments after a safe knock (where permitted) will give more reliable clues than surface appearance alone.