
Ruby vs Garnet: Color, Inclusions, Light, and Testing Limits
Ruby vs garnet: learn which visible clues a photo can show, which traits need testing, and the practical next steps before you rely on an ID.
Quick answer: ruby vs garnet in plain sight
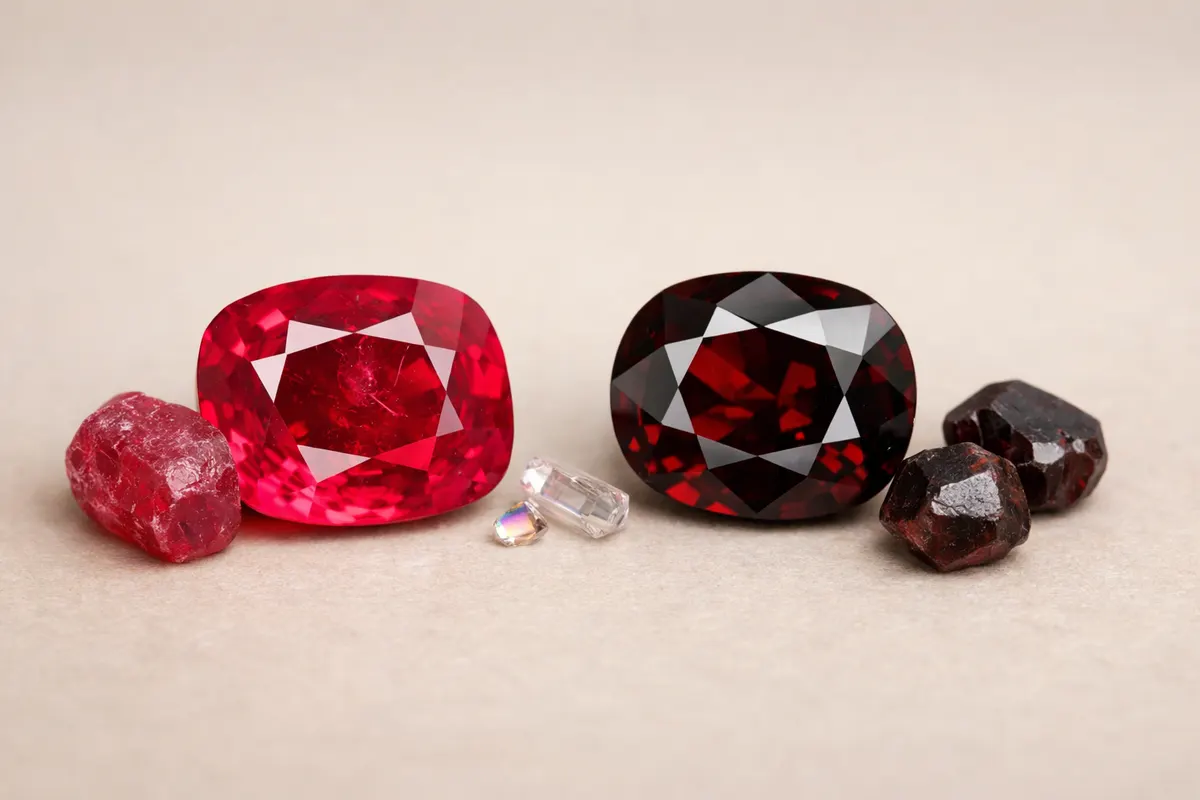
Ruby vs garnet can often be narrowed by a few clear visual cues, but a photo rarely gives a final identification. In broad strokes: rubies are corundum and usually show a vivid, saturated red with strong glassy luster and certain internal silk-like inclusions; garnets are a family of silicate minerals that range from wine-red to brownish-red, often appearing darker, less saturated, and with different inclusion patterns.
From a phone photo you can confidently lean toward one or the other when the stone shows classic markers. A brilliant, slightly bluish or pigeon-blood red with fine silk inclusions and strong reflective luster suggests ruby. A deeper, more brownish or orangey red, often with crystal or granular inclusions and a lack of silk, points toward garnet.
What a photo cannot prove: exact species (separate corundum colors or garnet species), precise treatment history, or measured properties like specific gravity and refractive index. Treat photographic ID as a shortlist that reduces possibilities, not as a certificate.
Quick practical clues to watch for before you decide: color tone (cool vs warm red), saturation (vivid vs muted), internal features (silk vs crystal inclusions), and how the stone behaves in strong light. Use these clues together rather than relying on a single trait.
- Bluish or pigeon-blood red, high saturation, glassy luster → leans ruby
- Brownish-red, orangey cast, or darker, muted red → leans garnet
- Fine silk inclusions (threadlike) often suggest ruby; granular or crystal inclusions more common in garnet
- Photos can rule out many lookalikes but cannot confirm species or treatments
Side-by-side: ruby vs garnet at a glance
The table below summarizes the most useful visible clues and the confidence you can place in each when working from photos. Use the surrounding notes to interpret any single row: no single cell in isolation is proof.
Photographic limitations affect several rows more than others. For example, pleochroism or reaction to polarized light requires special views, and hardness or density can’t be assessed from a picture at all.
| Feature | Typical ruby (corundum) | Typical garnet (common species) | What a photo shows | Confidence from photos |
|---|---|---|---|---|
| Hue and tone | Bright, often slightly bluish to pure red | Reddish-brown, orangey-red, or deep wine red | Overall red tone and warm vs cool bias | Medium — useful but can be lighting-biased |
| Saturation | High, vivid saturation | Often moderate to strong but can look darker | Apparent vividness in daylight photos | Medium — camera and exposure affect perception |
| Luster/transparency | Glassy, may be transparent to translucent | Glassy to resinous; often slightly darker | Surface reflections and apparent clarity | Medium-high for surface luster; internal transparency less sure |
| Inclusions | Needle-like silk, rutile, or fingerprint clouds | Crystal, granular, or reflective particulate inclusions | Visible internal patterns and shapes | High for obvious patterns; subtle inclusions may be missed |
| Reaction to light | Strong fluorescence (in some rubies); possible asterism in star rubies | Generally no strong fluorescence; some species weakly fluorescent | Color shift in mixed lighting may show | Low-medium — needs UV or angle changes to confirm |
| Hardness / density | Hard (9 on Mohs), denser than garnet | Variable hardness (6.5–7.5), density varies | Not visible on photos | None — requires tools |
| Common lookalikes | Spinel, treated glass, synthetic corundum | Spinel, dyed quartz, some jaspers | Shape, cut, and apparent color help narrow options | Low — lookalikes can mimic photos well |
When to suspect ruby or garnet from a photo
Use the ruby hypothesis when photos show a bright, saturated red with a cool or neutral tone and internal silk-like inclusions. Classic rubies often seem to glow from within under daylight: highlights are bright, midtones carry strong red, and the stone resists looking brown. If a red stone photographed in daylight holds a vivid red without turning brick-brown, lean toward ruby as the working assumption.
Use the garnet hypothesis when images show a darker, more muted red with brown or orange bias, or when inclusions look crystalline, blocky, or granular. Garnets can appear richly colored but lack the internal silk and fluorescent behavior that rubies sometimes show. If a piece looks heavier, deeper, or more ‘earthy’ in tone, garnet is often the better first guess.
Also consider context: provenance, setting, and price expectation in the listing or owner's story. A low-cost mass-manufactured red bead is more likely garnet, glass, or dyed material than an untreated ruby; conversely, jewelry described as fine antique or high-value deserves a closer ruby inquiry.
Apply different effort depending on stakes. For curiosity or casual identification, visible clues plus a cautious label ('likely ruby' or 'likely garnet') is fine. For purchasing, insurance, or resale decisions, plan for follow-up verification.
- Casual ID (low stakes): label as 'likely ruby' or 'likely garnet' with photo notes
- Purchase or appraisal (medium stakes): require in-person inspection or lab report
- High-value decisions: insist on refractive index, specific gravity, and treatment history
Why people mistake ruby and garnet
Lighting and camera white balance are the largest sources of confusion. Warm indoor light pushes reds toward orange-brown, making rubies look like garnets. Conversely, cool LED or flash can enhance saturation and hide brown undertones. Phone auto-exposure tends to clip highlights or boost saturation, changing perceived hue and masking subtle inclusion details.
Species overlap and lookalikes add to the problem. Spinel, for example, often appears very ruby-like in photos: it can carry bright red tones and excellent clarity. Glass and synthetic corundum can mimic both ruby and garnet colors. Without seeing pleochroism under polarized light or measuring RI, these lookalikes can’t be eliminated from photos alone.
Cut and setting also disguise clues. Dark settings or heavy metal surrounds reduce transmitted light, making transparent rubies appear darker and more garnet-like. Cabochons can hide internal silk, and heavily included stones can scatter light in ways that resemble the other species.
Context errors are common: sellers or owners may use the attractive label 'ruby' for marketing. Treat any identification that depends solely on a listing title or price as unverified until you examine the stone’s visual evidence yourself.
- Warm/indoor lighting pushes reds toward garnet-like tones
- Spinel and synthetic stones often imitate ruby color in photos
- Dark settings and cabochon cuts conceal internal silk that hints at ruby
- Seller labels are not reliable proof—photo evidence matters
Verification path
Start with enhanced photos: daylight (diffuse), a close-up with a loupe or macro, and an image under a neutral white background. A macro shot that reveals inclusion shapes is the single most useful thing a photo can add. Ask the owner or seller for images under multiple light sources so you can see warm versus cool behavior and any subtle color shifts.
Request or perform a few simple non-destructive checks if possible. A strong handheld UV lamp can reveal fluorescence (many rubies fluoresce red under shortwave or longwave UV; garnets usually do not), but fluorescence varies by locality and treatment and is not definitive alone. A jeweler’s loupe at 10x will distinguish needle-like silk from blocky crystal inclusions in many cases.
If the decision affects money or authenticity, follow with objective measures: refractive index, specific gravity, and inspection between crossed polars or using a dichroscope to check pleochroism. These tests require a trained examiner or lab and are the only reliable way to separate corundum from lookalikes like spinel or glass. Where possible, get a gem lab report for high-value items.
Practical flow you can use right now from a photo lead: 1) Take daylight macro and diffuse photos plus a photo under warm light; 2) Look for silk vs granular inclusions and note hue bias; 3) If clues point strongly to one option, label it 'likely' and state why; 4) For purchases or insurance, arrange an in-person check or request a lab report before final decisions.
- Photo checklist: diffuse daylight, warm indoor light, macro close-up, neutral background
- Quick at-home checks: loupe (10x) inspection, handheld UV lamp for fluorescence (note variability)
- Professional tests for certainty: refractive index, specific gravity, microscope inspection
- When in doubt for high value: ask for a gem lab report or take the stone to a qualified gemologist
Related guides
Next step: use Stone Identifier - Gemalyze after your visual checks
After you’ve taken daylight and macro photos and noted color tone and inclusion clues, use Stone Identifier - Gemalyze as a first-pass tool to compare your observations against likely matches. Treat the app’s suggestions as research notes, not certification: if the stone is valuable or the ID affects a purchase, follow the app’s lead with in-person or lab testing.
Take the next step →Frequently asked questions
Can I tell ruby vs garnet from a single photo?
You can often narrow possibilities from a single clear photo — for example, distinguishing a vivid bluish-red (likely ruby) from a brownish-red (likely garnet). However, one photo rarely provides definitive proof. Lighting, camera settings, and post-processing change color and hide or exaggerate inclusions. Treat a single-photo ID as tentative and follow up with macro images, different lighting, or objective testing if the outcome matters.
What photo clues most reliably point to ruby?
The most reliable photographic clues for ruby are a vivid, saturated red with a slight cool or neutral bias, glassy luster, and thread-like or silky inclusions (rutile) visible under magnification. Strong red fluorescence under UV can also support a ruby ID but is not universal. Use these clues together: color plus silk plus fluorescence increases confidence from a photo, but none alone is proof.
How can I use light or angles to tell these stones apart in pictures?
Take photos in diffuse daylight and also under a warmer indoor light to reveal hue shifts. Use a macro or loupe image to inspect inclusions. Rotate the stone or change viewing angles to look for pleochroism (color change with angle) and to expose internal features. Crossed-polarized or oblique lighting can help reveal silk or needle-like inclusions that look different from granular or blocky inclusions typical of many garnets.
When should I get professional testing instead of relying on photos?
Get professional testing when the stone’s identity affects price, authenticity, or safety — for example, a high-value purchase, an item for resale, or insurance appraisal. Professional tests (refractive index, specific gravity, microscope examination, and lab reports) are required to confirm species, treatments, or origin. Photos are a useful filter for deciding whether to pursue testing, but they are not an acceptable substitute for lab verification in high-stakes situations.